


Shift Top | Wiksten
Even though I have been sewing garments over a year now, I still consider myself a newbie sewist. That’s because even though I have made several items, I follow the directions and patterns religiously, aside from the occasional lengthening of the garment, I make no major modifications at all. I’m just too scared of messing up, and I’m not one to make muslins. I know I know, I SHOULD make muslins, but I’m just too eager to make the garment that I skip this step. I also think that the patterns that I have made are for tops that are not super fitting so it shouldn’t be a big deal if I don’t make it. Then, I end up regretting it.
Case in point - the Wiksten Shift Top. Yes, it’s a roomy boxy easy sew, but I have learned that even with simple tops like this, it’s a good idea to make a muslin. Not only make a muslin, but also really look at which fabrics to use.
I have been eyeing this pattern for the longest time because it makes such beautiful tops. It’s right up my alley - that Japanese vibe that I so love. It’s like the Shirt No. 1 but with sleeves and pockets! Yes, I could have probably used that pattern to make something similar, but again - I’m a chicken and fear modifications. So this pattern was perfect because it has the pattern pieces for these options and also gives you instructions on how to construct it. It gives me practice to add options to a simple top, and hopefully one day I’ll feel confident enough to just wing it and make massive modifications to a simple pattern.
I was very excited to get the pattern and shop for the fabric that would go with this top. I have seen other makers use a cotton/linen blend so I opted to purchase the Robert Kaufman Forage by Anna Graham from Stonemountain & Daughters Fabrics for the top, and grabbed the Printed Rayon Twill for the dress version. Guys, this shop is just beyond amazing, it’s a sewist’s dream - they carry all kinds of gorgeous fabrics and the people are super friendly, I’m very lucky to live nearby that I can pop in and fondle all their goodies.
My body measurements put me on size 14 for the bust, size 8 for the waist and size 12 for the hips. So I picked size 12 for the make. Off I went cutting the linen/cotton fabric (after washing and drying it first), which was really quick because the top pattern was just 5 pieces and all pretty straight. I decided not to do the interfacing because the fabric was already feeling a little stiff. I was able to sew it in one afternoon because it’s a very simple sew and the directions were very well detailed and straight forward. I flat felled all the seams because I have decided this is the finish that I like the most so I’ve been doing this for the last few makes I’ve made. Everything went without any issues and then it was reveal time.
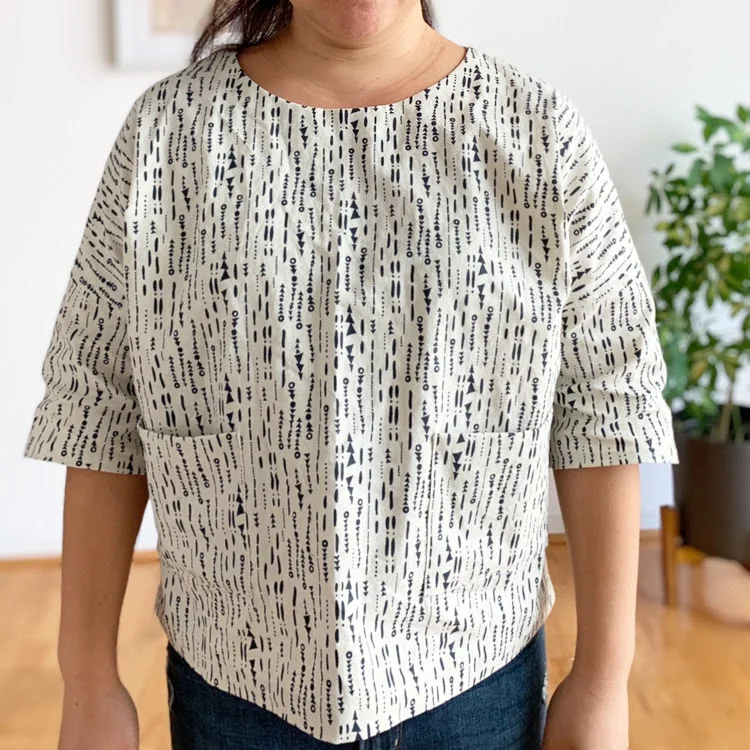
Time of truth - I hated the top! I looked like I just cut a bag and put it on. Look at the picture and judge for yourself!
Look at how baggy it was, and how stiff! I was standing straight for that shot and look how the belly part just comes out. And all that extra fabric around the arms and the back. Ugh!

What was I doing wrong? Why was mine all whacky like this but I see so many beautiful makes out there? How could I fix this? The fabric is too precious and pretty to just throw it away. Maybe my sewing skills were really crap.
Armed with the desire to salvage this top, I went online to read through other people’s experiences and their comments. Maybe I was missing something, maybe there was a technique I didn’t know to use, maybe this was the wrong fabric to use. There’s gotta be a way I can make this work! I was determined to find a solution!
From what I could gather from other people’s experiences, it seems that sizing down was a common thing to do. Especially for big-boned girls like me, where super oversize garments just don’t look flattering. I saw other makes using linen/cotton but theirs looked a bit softer, so maybe I just needed to wash it a couple more times and the fabric will soften up a bit more. But I also got good advice from a friend I have had the fortune to meet on IG during my sewing journey that always makes forward shoulder adjustments because her shoulders sit forward. Mine do that too, so hey, let’s give that a try.
I decided that this was the time to be adventurous and make adjustments! Make all the mods I can think of. What’s the worst that could happen? This shirt in its current state was not going to be worn, so if I don’t experiment with this now, it’ll just be waisted. Might as well be bold and make changes to it - treat this as the muslin that I should have made. At the end, it could end up being a wearable muslin, right?
The modifications that I decided to make were:
Size down and grade between sizes - top in size 10 and body in size 8. I did the size switch where the armhole meets the bodice.
Forward Shoulder Adjustment - I made the simple method and moved the seam up by 0.75” forward. I watched Inhouse Pattern Studios YouTube video as guidance.
Widened and lowered the neckline - I winged this step so I am not really sure how much I took off the width or depth. But it was probably about 1” on each side and 1” down the front neckline. I’ve realized that very tight necklines are not flattering on me.
Lengthen the bodice - made it longer by 3”. I always forget to do this on patterns, so I end up with “cropped” tops ALL THE TIME! Something I have to remember to do always, because I have an ultra long torso and my legs are actually short. I’m 5’7” overall.
Lengthen the sleeves - The current view has the sleeves just below my elbow, so when I folded my arms, they were hitting right at the wrong angle. So I decided to make it 1” longer and see if that works better.


With the new neckline, I would have to make new facings, so I figured I could just trace the new neckline and mimic the pattern by making it 1.75” wide. I then grabbed the ruler and traced little dots at 1.75” from the neckline and finally connected all the dots. Surely this would work?


These might not seem very big changes for some of you, but for me - this was a defining moment in my sewing journey. I have never done all of these together but the opportunity presented itself and I was not going to back down.
Because the modifications to the shoulders and the lengths, I was not able to use the original top to edit, because the cut fabric was not covering all the changes in my modified pattern. And because I didn’t have more of that linen/cotton fabric, I was not able to use the same fabric. Instead, I had some beautiful black signature finish linen in my stash from Fabrics-store that I got on sale on their “doggie bag” section (their remnant page on their site) that would probably work. I’ve seen a lot of people use 100% linen for this top and they all look gorgeous. This linen is already super soft because of the “signature finish” which their site defines it as: “Our FS Signature Finish was developed exclusively for us using a special "Hot Wash" process that makes this linen super soft with a comfy, classic look you'll love at first sight. As a Bonus, this process removes almost all of the initial shrinkage, giving you more time to get your projects done.”
Once I had all the pattern pieces cut up, it was back to the sewing machine. Repeated all the same steps as in the instructions and then the second moment of truth was before me. Check it out.


Mama Mia! I was seriously jumping up and down of joy when I put this on. I almost cried because I was so happy! The feeling of being able to conquer a challenge and come out the other side successful, PRICELESS! I did it guys, the changes didn’t screw up anything, instead - they made everything better! It fits so much better, there’s less bulk around the boobs/armpits, I don’t feel like the shirt is chocking me anymore, and the shirt doesn’t drag backwards like it did before. Oh, and the new length is perfect! Plus, this fabric is much friendlier for this pattern than the linen/cotton. I’m sure that had a lot to do with it too.
Lesson learned - don’t be afraid to make your own changes. Only you know your body best. None of us are made the same measurements, and patterns are only a suggestion. Unless the pattern was made specifically for you, you most likely will have to make changes to it to fit YOU. I know I have a larger top compared to bottom, so I have to be comfortable to make these changes to the patterns I purchase. Otherwise they will never fit me. Don’t shy away from challenge, because that’s the only way you’ll learn and grow. And even if you make mistakes, that’s also ok because you’ll learn from the experience and no one is harmed (except for your wallet maybe…haha). I have unravelled the original make and I’ll find a different project to use that fabric with.
I think this is the best top I’ve ever made to-date. I fell in love with it immediately after finishing this version. I’ve now been wearing it for 2 days and the linen gets softer and less wrinkly. This fabric is gorgeous - I need to buy more of it. And you know what? Black suits me. :)
Next up - conquering the Shift Dress. I’ll use the edits I’ve made to this top and draft the long dress version. Still plan to use the rayon twill fabric I previously purchased for it. Stay tuned to read about that!

