


Self-Drafted Girl's Skirt with Suspenders
Anyone that knows me know that I LOVE LOVE LOVE My Neighbor Totoro. It's my favorite movie of all times. I used to have the VHS and DVD copies of them and used to play them on the TV on the weekends when doing other things around the house. It's just such a warm movie to watch!
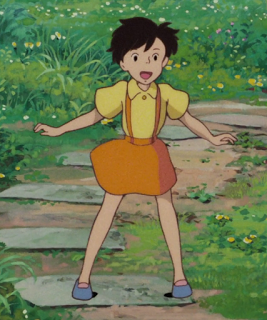
Satsuki from My Neighbor Totoro
So, when a friend of mine texted me to ask if I would be willing to make a skirt for his daughter so that she can look like Satsuki for ComiCon, I jumped at the opportunity immediately. Saying YES meant that I could geek out a bit about Totoro, make a little girl happy, and sew a skirt for the first time ever! That's true y'all, up until now, I have not made a skirt. Honestly because I do not wear many skirts or dresses, I'm more of a pants and shorts type of gal, but I do have a few patterns that are on my list to test out my sewing skills with - like the #gypsumskirt from SewLiberated. I also have her metamorphic dress in my to-do list.
I only had a couple of days to sew this skirt and ship it down to Los Angeles. Immediately jumped on my laptop and started researching how to sew a skirt. But it's not just any skirt, I had this idea in my head where the front of the skirt has a flat waistband and the back has elastic waistband. When I searched for this type of skirts online, they were all gathered skirts, but if you look at Satsuki, her skirt is not gathered. Her skirt is more like a skater skirt with suspenders and probably has a zipper and button on the back. But I wanted to go with elastic in the back because I couldn't test try it to make sure it fits right, so I wanted to have a little wiggle room.
Unfortunately, there was no tutorial online for a skater skirt with only 1/2 elastic waist. So, I had to get creative. Being creative is not one of my strong suits, I'm much better following directions, so I knew this was going to be a big challenge. After hours of research online, I essentially combined two tutorials into one: Circle Skirt Maths - Explained! and Suspender Skirt Tutorial | you and mie.
Fabric Pieces:
Skirt Body:
Front Body: I used the Circle Skirt Maths page to calculate for the quarter circle skirt measurements but divided that in 1/2 - because I only wanted the front part of the skirt - this ended up being cutting a 12X18 inches piece of fabric. Since the top part is shorter than the bottom part, I made sure that the top part was centered in comparison to the bottom, so at the end, you end up with a trapezoid.
- Back Body: I used a 18X18 inch fabric because I added 6 inches for the wiggle room
Waistband:
- Front Waistband: 12X4 inches fabric
- Back Waistband: 18X4 inches fabric
Suspenders: Friend's daughter waist to shoulder measured 12" so I went ahead and doubled that + 3 inches for the cross and + 1 inch for the waistband insert. For the back elastic waistband, I used a 1" waistband cut at 11 inches in length.
Elastic: 11 inches of 1" elastic.
Steps I took:
- Cut out fabric pieces.
- Sew front and back bodies together. I used a 1/2" seam allowance and used overlock stitch to finish the seams and ironed flat.
- Sew the front and back waistbands together. I used a 1/2" seam allowance and ironed open the seams.
- Folded one of the waistband edges inwards by 1/2". Pressed with iron.
- Sew the waistband to the skirt body using the raw edge part. To do this, with the skirt right sides facing the right sides of the waistband, line the two edges and sew at 1/2" seam allowance.
- Press the seam towards the inside of the waistband - away from the skirt.
- Flip the waistband inwards and line up the finished edge so that the edge is about 1/8" below the waistband/skirt line. Press and pin in place.
- Grab your suspender pieces and fold them in half - lengthwise, and press.
- Clip the corners and turn the suspenders right sides out. This can be a bit tricky because the suspenders are not too wide, so you'll have to be patient. I found that it helps start things out when I put my index finger on the sewed tip and push in while my other fingers are pulling the fabric away from each other, plus rub the fabric upwards. I know it sounds weird, but hope you get the idea. Once the tip of the fabric is in the "tube", you can switch to a pen or a chopstick and continue pushing inwards while pulling up the fabric. Leave the other edge raw.
- Using the raw edge of the suspenders, place them underneath the back waistband fold, in the position desired. For me, my waistband was 18" long, divided in 1/2 and thought 4" in from the borders would be a pretty good measurement. Held the suspenders in place with some pins.
- With the skirt right sides out, and using a 3.5mm stitch width, sewed on the ditch between waistband and skirt. Make sure that you are catching the waistband from the inside of the skirt. This is why you do #7! Make sure that when going through the suspenders, the suspenders are still lined up properly. Also, leave about a 2"-3" opening, so - do not close up the stitch!
- using the opening created in #11, insert the elastic and guide the end of the elastic to where the back waistband seam starts. Line up both (end of elastic and back waistband seam) and sew along the seam stitch. This is to catch the elastic and hold it in place.
- Pull the elastic's other end to the other end of the back waistband seam and sew on the seam stitch again. This will create the back elastic waistband and the back will be gathered because of the extra fabric but shorter elastic. Your front should still look flat.
- On the suspenders finished end, sew buttonholes. I used the buttonhole foot in my sewing machine and sat back to let the magic happen.
- I have cover button kits to make my own buttons. So I took some leftover fabric and created buttons so that they were matching the skirt and would blend in.
- From the front waistband, I winged it and thought 2" in from the border would look good for the suspenders to sit. Hand stitched the buttons in place.
- Oh!!! and to finish the skirt, sew 1/2" seam to the bottom of the skirt.
That's it! Here's the finished work. I sure hope that the skirt fits! It's so hard to sew for someone else other than yourself. When I saw for myself, I try the piece at the milestone steps to make sure that I'm going the right track. But it's so hard to do a custom size one. So, fingers crossed!!!

Front View

Back View

Back Waistband

Buttonhole and custom button
What I learned:
- Sewing a skirt is not hard at all! Thankfully, I've done waistbands when sewing pants already, so this seem straightforward.
- Sewing a flat front elastic back waistband is not hard either! This was what I was most concerned about when starting this project, but it turned out to be quite simple and no weird movements. Once thing I do suggest - when closing the waistband, it's easiest to just close the back waistband first, insert the elastic, sew the elastic in place, then finish closing the front waistband. This gives you good access to the waistband side seams needed for sewing the elastic.
- I hate flipping suspenders. Or any tube like fabric for that matter. If the fabric was thinner, I would have done the 4 fold thing where you fold the sides then fold once more, and stitch. But I used a canvas for this skirt which would have caused the suspenders to be way super thick if I did that.
- I still love Totoro. :)
Do you have any advice for sewing a skirt with suspenders? What would you have done differently? Or what tricks do you know that you could share?

